More Photos Below!Gallery
…Don’t forget: this stuff applies equally to Skating as to Classic! (The essence of each is the same.)
Tourers need a grasp of it as well. Tourers use a wider variety of moves but these “max efficiency” ideas are the core, also they get put into play on challenging uphills.
I’ve been gleaning online info for ideas that seem like they’d be particularly good for helping people “get it” with XC skiing.
This isn’t a Step by Step how-to. If you’re just starting, you should take a class that walks you thru the initial progress. These ideas are to help you take the next steps, especially if there are areas that you seem stalled out on.
***
Pursuit of Perfect Classic — Gus Kaeding — www.masterskier.com/article.asp?aid=420
EXCERPT:
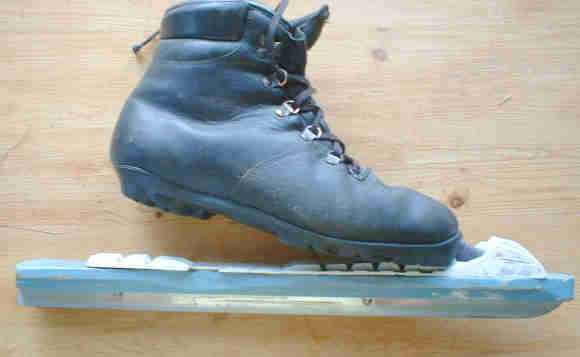
A good trick to obtain correct starting position is to “draw the guns.” Stand up and draw your pistols from your holsters like it’s high noon on Main St.
What this should have achieved are supple ankles, slightly bent knees, forward hips and a slightly rounded back, which activates the core.
The position should feel very normal and athletic, if not, something is wrong. Put on a pair of poles and superimpose some skis and you’ve got a basic classic position.
After attaining a good classic position, let us examine what sets classic apart from skating, the kick phase.
Every time I kick I go through a mini checklist and it starts with pole plant. As I am striding out, I plant my pole close to the tip of my boot a split second before my kick starts. I believe as much as 75% of the arms usage is determined the second the pole hits the snow, so make it count! This is to give a little extra length to the gliding ski.
Be sure to not over extend the arm, instead keep it close to the body and activate the larger muscles of the shoulders and abdomen.
After the pole tip hits the snow the kick should start. I prefer to focus on the leg coming forward since that is the direction we are trying to go. If you master the leg going forward, the other will usually take care of itself.
When striding forward do not think about the foot instead, focus on the hip. Lead with the hip and press it as far down the trail as possible.
As the feet pass each other in the middle, transfer your weight from one ski to the other and with your hip over your foot (knee slightly bent) glide out. Weight transfer should be crisp and fluid. Think of an impulse that has been shot through your body. This will serve to “snap” your weight from side to side and set the wax on the kicking ski.
Once the wax has been set, do not focus on kicking back, instead focus on driving forward then riding the gliding ski as long as necessary.
***
Downhilling:
New skiers can be nervous about the unsupported “naked” feel of nordic downhill. Actually, new ski gear offers a TON of support and control while still being ultralight, but still. So pick a gentle hill and glide down it.
Drop into the athletic ‘ready’ position — knees bent a bit to absorb or adjust to changes in the trail — hands forward and a bit low (pole baskets to the rear). (If your legs are stiff and maybe you’re hinged at the waist and your hands are waist-high or higher and somewhat back — well — you’ll fall unless you luck out. You can’t respond to any changes in the trail or turn in control from such a position. You can partially skid your feet from that position and by doing that you might not fall, but it’s not stable.)
As you glide down, step back and forth across the trail. Shuffle your feet. Don’t stay locked to the ground as you glide. Try a tracked trail and glide down with skis in the tracks — but lift alternating feet. Get used to gliding while weighting your feet differently. Then try a downhill that has a turn in it. Make the turn by stepping around it with small steps as you glide.
Then practice snowplowing by putting a foot out and angling the tip in and tipping the ski until it skids as you go down the hill. Put more weight on it to make it skid more. You can do this with both feet to slow down or either foot to help you turn.
Weighting and unweight skis is how you turn them in XC or Alpine. When you unweight a ski you can move it, when you weight it, it starts working (to glide, turn or scrub speed).
Practice on bigger and bigger hills. If a hill seems too big, sidestep down until you’re confident (or take skis off and walk down). Then try it again only don’t sidestep down as far. The way to master downhills is incrementally, always starting with only as much downhill gliding as you are comfortable with. Don’t give up! Keep trying to ski a hill from higher-up than before. But also know your limits of both comfort and control. You might not be able to easily stop on a fast downhill but you should feel calm and like you can adapt to the challenge of the hill as needed. The incremental approach will likely surprise you in a positive way.
***
Falling: Learn to ‘splat’ to the side when things go bad. Don’t pitch forward onto your hands or knees. All sorts of bad things happen when you do that. Flop to the side. Usually you have time to fling your poles so you don’t land on them. (I’ve somehow protected my fragile carbon poles that way for decades and hundreds of bad crashes. Knock knock.) If a downhill is getting out of hand, just sit back and down. …And a bit to the side, if you can. To get up again, sort yourself out, bring the skis alongside each other below you and across the slope. Then bend your knees, gather yourself, put a hand down somewhat near a ski binding (in front of a foot) and get up on a knee then stand. Don’t rely too much on poles to help you get up. Rely on your footing.
***
From FASTERSKIER Forum:
Question about how to get high hips… Suggestions follow…
***
What would happen if you practiced with poles that were extra long? Might force high hands and the feeling of getting up tall on a ski?
***
How is her double poling? For me, that seems to be the gateway for high hips because you don’t need the one ski balance, and can focus on body position.
***
Try doing diagonal stride stair bounding. Start by bounding to one step at a time. Landing on ball of foot with good forward arm extension and rear leg fully extended along with back arm extended. Once this is mastered do the same drill skipping one step each bound. Hold the landing position for just a second. Once this is mastered skip 2 steps.
***
Ski and play without poles all over the place.
***
Visual long arrow coming out of the center of gravity below belly button — direct that arrow down the trail and from ski to ski.
***
Teach a skier to have their weight forward, ankles and knees bent so that the hips are above their feet and the more they practice the more they can get into this position.
***
I make the most progress on these issues by going back to double poling- “fall like a tree” + “lock & load” + “pinkies to eyeballs” drills. Gradually hips get a little more forward, hands get a little higher & a little closer to the face.
***
For classic, my favorite drill is fast striding down a slight decline. You simply can’t keep a stride going & get the back ski off the snow if your hips are back &/or weight transfer is incomplete. The feedback is immediate.
***
Good Skate drills — *No poles, fling arms like V2A, both at once, with every other skate. *Diagonal skating plus “scouting” — stand up on each glide ski and “look for your friends” — put hand to shield eyes like you’re searching the sea for a lost ship — makes you stand up. *Compare/contrast: Do really low, crouched edging skating; then try standing up tall and ride flat ski — feel the differences. Tipped-forward from ankle and flexed knee gives best of both worlds.
**
Lots of time DPing with good form & striding down slight hills are still the foundations I go back to.
**
TIPS FROM STEVE HINDMAN, how-to columnist from Cross Country Skier mag (also wrote the best how-to book)
To help your ski to grip, quickly increase the flex in your knee and ankle a split second before you begin to extend your leg for the kick. Mimic the down up motion you would use to spike the needle on a bathroom scale.
* Leap from ski to ski. Then back off and move from ski to ski with the same quick and concentrated effort but eliminate any unneeded up motion. Land on each ski as if you were stroking the fur of a large cat with your foot.
*Ski like a pouncing cat/lion — gather, coil, spring — but ‘stealthy’-like.
***
Poling
* Keep hands low as they swing forward to eliminate excess shoulder movement. Point your thumb down the track as your arms swings forward.
* Poling should start before the kick. To help syncopate your arm and leg, wait until your poling hand brushes the thigh of your weighted leg before swinging your other leg forward and beginning your kick.
***
Tip from XCSkiWorld.com:
To get feel for high hips, put on poles, put em in front of you like doublepoling (near your binding). Weight the poles. Stand up. Lift one leg up behind you without much flex in it. The way you’re standing on your front foot now is good for skiing. (But when skiing you don’t EVER intentionally lift or fool with your legs or hands when they’re behind you — just let em fling as they like. Ski will come off track behind you after kicking if you have flex in ankle and forward tilt.)
To get feel for stand-up and forward-drive: Have someone hold their poles behind them then have someone go behind them and grab the poles then skate-push them down the trail. (You can also try pulling someone around by a rope tied around your waist.)
***
A good visual is not to think of kicking back — that might put curve in your low back. But to ignore the kick foot and focus on forward leg drive. The kick foot just has to “stay put” as you jump forward.
***
Dryland imitation is great. But I discourage static posing. A little is OK, though. I find balance comes from constant motion — some slow, some fast. But it’s also from good posture. Posture can be practiced through brief posing.
Standing and flinging arms and legs is good for practicing Classic. Tipping forward and catching yourself from falling with your foot is helpful.
Dryland totally helped me to learn V2 Skating. Hop back and forth imitating it until you find your rock solid way.
The Anikins (USSR medalists/medalist-coaches, USST coaches) said that dryland can 99% imitate best skiing.
***
I like trying to make Classic go as fast as Skating. Takes a sharper impulse on the flats — then, to not spike your heart-rate, you’ll have to make sure to relax between hits. Start from ‘first things first’ — compare the feel of the windspeed, then compare the glide-pace of the skis, try to take the side-to-side losses of skating out of your comparison “feel.” Make your classic feel as fast as your skate — or as close to that feeling as you can. What do your different paces feel like, anyway? What’s your best gauge? Some gauges increase stress: “I’m trying harder, working more.” Some increase relaxation: “I feel more breeze as I look down the trail.” (It’s better to consider the experience as a whole. Also usually more accurate.)
If you can make your skate skis feel like they’re flying (or at least gliding well), you should be able to do the same with your Classic skis. Kick wax shouldn’t slow a ski much in tracks. And the direct-down-the-trail efficiency of Classic should mostly make up for the longer push of skating (which is half-wasted due to side-losses).
On an uphill that’s a bit too steep for easy V1 skating, but which isn’t so steep that you have to herringbone it in Classic, you may well be able to Classic faster than Skate.
Work on increasing uphill glide in Classic, but not by going slower (don’t get it by slowing tempo and bogging down). Compare hill times. Find your own style by seeing what way you go fastest up for the lowest heart-rate. Is there any way to lower work effort without going slower? …It’s usually possible by relaxing more, by being smoother and more efficient.
Find a moderately steep, moderately long uphill. Then repeat it at a moderate level. So you’re not getting more and more tired as you do it. It should be sustainable. Well, for 8 repeats, say. Try again next day. Time it, feel it: what helps? What does screw-up feel like — and what do you do when that happens. What does ‘better’ feel like? Any pattern?
***
More ideas that really stand out from Steve Hindman’s book (he’s the best…of course he probably got a lot of his ideas from other people, but his book is the best)…
*To get good forward leg drive in Classic Striding, and to avoid ski slap, bring your foot thru with the toes lifted — with the sole flat to the ground — with the ankle flexed already. This propels the ski forward rather than slapping it down. Our goal is to zoom smoothly down the trail, not to move up or down. Some up/down motion is needed but we should try to avoid disturbing our down-trail motion flow.
*Imagine jumping across creeks that are across the trail, but try to do it smoothly with not much vertical.
*Classic skis get grip from an area of the ski that centers around the binding, not around the whole foot. The grip area is, thus, forwardly placed. To press this area down you need to weight the front of your foot. (But be sure to keep your heel down.) To do this, you have to flex your ankle and press down with your knee. If you look down your knee should cover your view of your foot. As your (flat) glide-foot shoves forward, you’re dropping a bit and flexing your kicking foot. This gives you grip as the feet pass each other. You’ll have grip as long as your heel stays down and the ski is forward-weighted. As you fully get onto your glide-ski the kick is over. (Remember, you’re not actually kicking back!)
*Get good kick by forgetting about kicking back! That foot just ‘plants.’ But DO focus on the forward-swinging glide-foot! In fact, pretend you’re kicking a ball down the trail! Kick that thing! Driving forward is what we want. The planted foot (and pole!) are what we kick off from — they hold the “rear” of us in position as we launch down the trail.
*To help get good poling action imagine that you’re tossing cups of coffee down the trail.
V2A, as they say. Or “Open Field.” Glide side, pole side. Over’n’over. Pop-Drop. Hangtime. Flying angel. Fling-whip. Balance because of motion. Bone-on-bone stability. …All notions that can help.
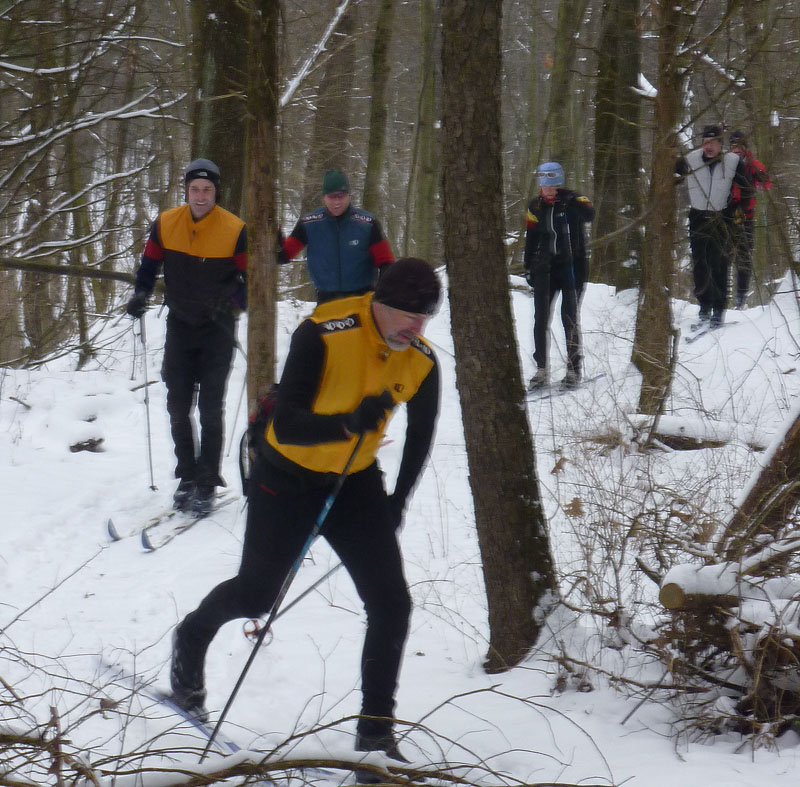
Line of skiers flowing up a hill in the Potto Raid. 3 hours ahead of them. Relaxed. Flexed ankle, flexed knee. Dynamically ready. (Who’s that in the lead? Why, it’s RadNord!)
